
Useful MVC routing post
why would I use node.js?
Node.js is now HUGE and a lot of devs are jumping to it for their solutions. Why The Hell Would I Use Node.js? A Case-by-Case Tutorial is a really good primer on node.js and what you should think about when considering it as part of your solution.
View locally hosted sites (IIS Express) through other devices
I wanted to browse to a site hosted locally on my laptop. It seems its a bit more complex than what I remember with IIS 6 / 7 .
This blog post explained it all.
lalexgraham.wordpress.com 2013 in review
As well as the book (See prev post), my next bit of good news dropped into my inbox from WordPress just before New Year. Even though I’ve ignored my blog (something I only really started to keep as a reference for me really), I was amazed to read the stats have grown since last year. If they are true then I am shocked :O One of my resolutions is to give my blog some more attention. Thanks to everyone who has visited. I am thinking about how to make it better so please get in touch if you have any suggestions on how I can help people with Sencha Touch or anything else you may be reading on here. Happy New Year!

Here’s an excerpt:
The concert hall at the Sydney Opera House holds 2,700 people. This blog was viewed about 22,000 times in 2013. If it were a concert at Sydney Opera House, it would take about 8 sold-out performances for that many people to see it.
A Sencha Touch book I helped review
Last year I was approached by Packt to review a book on Sencha Touch 2. The book, Sencha Touch 2 Mobile Javascript Framework is by John Earl Clark and Bryan P. Johnson, who have also produced the book Creating Mobile apps with Sencha Touch 2 for Packt . Though the book doesn’t really use Architect, it gives a really solid grounding in the basics of Sencha Touch and covers a lot of ground quite quickly. It differs from their first book in that rather than do an app for each chapter, it gives more detail for the most important aspects of a Sencha Touch App. After reading the book, you should be able to put together a basic application and if you are using Architect it will give you insights into what’s happening in the code. A good read. Steep price in print but cheaper for the ebook;)
Sencha Touch Dynamic Model to accommodate schema changes
Sometimes data changes and your application has to accommodate this. Maybe you have fields that are user defined for example. I have put together some code that would enable this on Sencha Touch, allowing for the fields in a model to be defined dynamically.
I have used fiddle.sencha.com for the first time to show this example. It can be found here.
The fiddle uses the same list and model and store but handles entirely different data. By changing three things (dynamicItemTpl, data[] array for the dynamicStore, and data array in the fieldsStore) you can either show people or film titles in the list. This is a very basic example, but you could feed all three into Sencha Touch to create your fields on the fly.
This is a quick post but hopefully the example is self explanatory. As always, any comments or questions are welcome.
Using .Net MVC and Sencha Touch: syncing localStorage and remote storage with Ext.ux.OfflineSyncStore
Since writing the post an example of syncing localStorage data with remote storage, I wanted to improve on how to get data stored locally on a Sencha Touch app. I was sure there was a better way to do the syncing and that also the sync wasn’t true syncing as it only read in the data from the remote database. It didn’t write back. So this new project will take it a stage further. The premise is the same, that the user only acts on the localStorage and any interaction with remote storage is confined to the sync. The difference is that the syncing is both ways, so reading in and writing back to the database. This project took lots of attempts to get right. To begin with I extended the code from the first post, loading localStorage from remote storage on app launch and then adding entries to localStorage then syncing these to remote….But found it became too complex to manage.
I then found the Ext.ux.OfflineSyncStore plugin created by Stuart Ashworth of Swarm Online. A really simple to use library which does exactly what I wanted…It gets data from a server when online, puts it into localstorage (offline) then syncs back any changes to the data. Stuart kindly provides an example to get started with this, using a Person Model containing FirstName, LastName and EmailAddress as the fields. In this post I explain how I took the example and included it in a simple Sencha Touch app that lists the entries in the Person store and allows you to add entries. For the back end I decided to use an Asp.Net MVC project. I have found using the framework to be surprisingly easy and had a working back end in a matter of hours. These are the things I’m going to cover.
- Database
- ASP.Net MVC backend
- Sencha Touch project
The code for the whole project is on my github space at https://github.com/lalexgraham/.NetMvcSenchaTouch2OfflineSyncStore . The sencha code can be found in https://github.com/lalexgraham/.NetMvcSenchaTouch2OfflineSyncStore/tree/master/Person/Mobile
Database
I used sql server 2008 express to host the database. To create the database right click on Databases and add a new database. Call the database “Person”.
Next create one table to hold the data:
USE [Person]
GO

/****** Object: Table [dbo].[tblPerson] Script Date: 06/09/2013 12:43:38 ******/
SET ANSI_NULLS ON
GO

SET QUOTED_IDENTIFIER ON
GO

SET ANSI_PADDING ON
GO

CREATE TABLE [dbo].[tblPerson](
 [PersonID] [int] IDENTITY(1,1) NOT NULL,
 [FirstName] [varchar](50) NULL,
 [LastName] [varchar](50) NULL,
 [Email] [varchar](100) NULL,
 CONSTRAINT [PK_tblPerson] PRIMARY KEY CLUSTERED
(
 [PersonID] ASC
)WITH (PAD_INDEX = OFF, STATISTICS_NORECOMPUTE = OFF, IGNORE_DUP_KEY = OFF, ALLOW_ROW_LOCKS = ON, ALLOW_PAGE_LOCKS = ON) ON [PRIMARY]
) ON [PRIMARY]

GO

SET ANSI_PADDING OFF
GO
ASP.Net MVC backend
Once the database has been built, you can build the .Net MVC project. I am using VS Express for Web 2012 to build the solution. Open VS2012 and click on New Project on the Start Menu.
A project dialog opens, select ASP.Net MVC 4 Web Application as the project. Name it Person. The solution should follow the same naming. Click on OK when done.
The following dialog asks you to select a template to work from. Select WebAPI as the template. Leave the View Engine as Razor and the “Create a unit test project” unchecked.
The project will then be setup. When finished, the Solution Explorer should be open on the right of the screen. First you need to add a Model. Right click on the Models folder and select Add>ADO.NET Entity Data Model. A new wizard opens to set up a database connection. Leave Create from Database highlighted and click on Next.
The next screen will ask to set up a connection to a database. Click on New Connection. Enter the server to connect to and the the Database.
The final screen will ask what Database objects will be included in the Model. Just select tblPerson in the Tables section and leave the Model Namespace as PersonModel. Click on Finish. The Model will be built.
There may be some errors listed after adding the Model. Ignore these and just build the solution. The errors should disappear.
The next task is to add a controller to provide restful URLS in order to select, add and delete from the tblPerson table. To begin adding the controller, right click on the Controllers folder and select Add>Controller:
A new dialog appears, within which you enter the config to setup the controller.For the name, enter PersonController. For the Template in Scaffolding Options, choose MVC Controller with Read/Write actions and views, using Entity Framework. For the Model, choose tblPerson(Person) and finally for the Data Context Class choose PersonEntities (Person). Select None for the Views drop down, then click on Add.
Once the controller has been added there are a few amends to make to the code so that the data being sent and returned is in json format . First of all we want to return json formatted data to be returned by the Index() function. To do this replace
Function Index() As ActionResult
 Return View(db.tblPersons.ToList())
End Function
with
Function Index() As JsonResult
 Return Json(db.tblPersons.ToList(), JsonRequestBehavior.AllowGet)
End Function
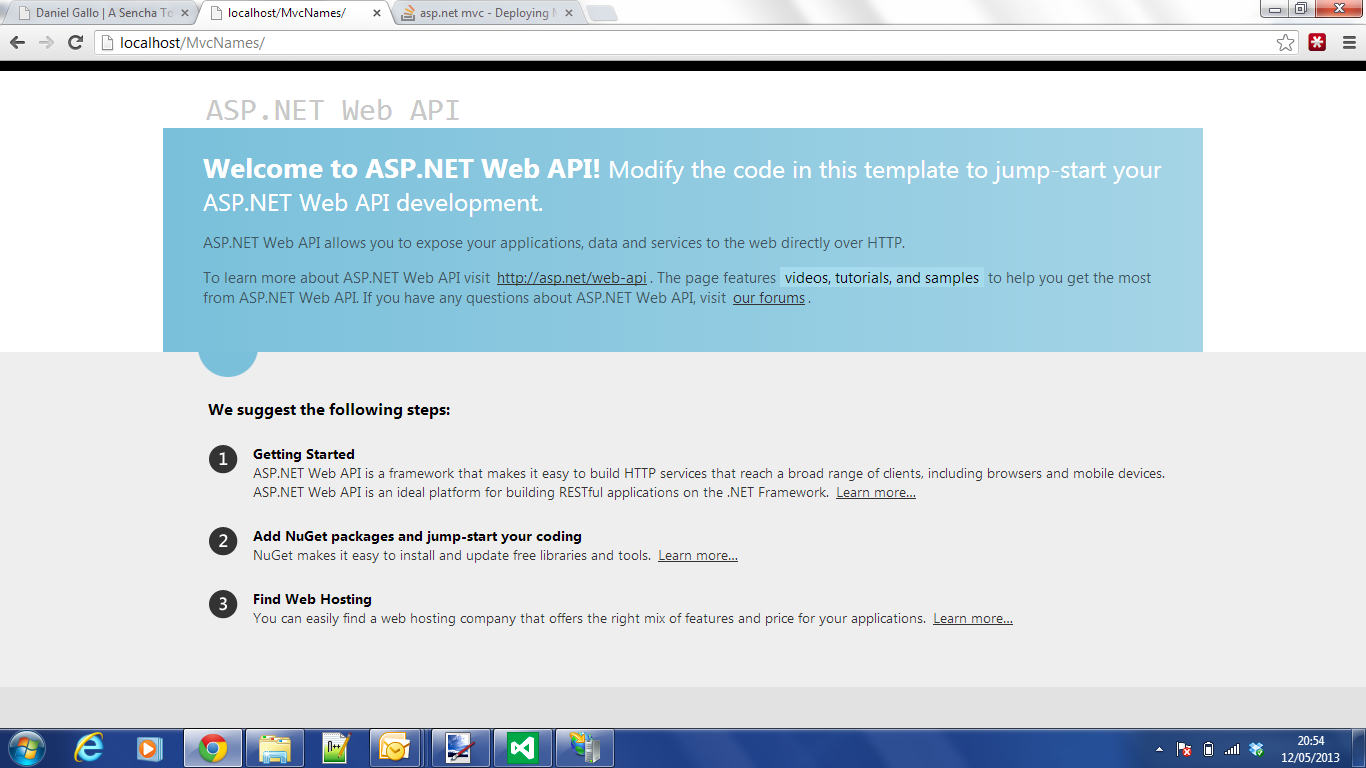
Build the solution and then debug . Browse to the http://localhost:xxxx/Person url , and you should see the data in tblNames outputted as json
Now just one more amend is required to the code. Change the create (post function) from
<HttpPost()> _
Function Create(ByVal tblperson As tblPerson) As ActionResult
 If ModelState.IsValid Then
 db.tblPersons.Add(tblperson)
 db.SaveChanges()
 Return RedirectToAction("Index")
 End If
Return View(tblperson)
 End Function
to this code
<HttpPost()> _
 Function Create(ByVal tblPersons As List(Of tblPerson)) As JsonResult
 ' If ModelState.IsValid Then
 For Each p In tblPersons
 db.tblPersons.Add(p)
 db.SaveChanges()
 Next
 'End If
 Return Json(New With { _
 .success = True, _
 .rows = tblPersons.Count _
 })
 End Function
<pre>
so again just jsoning what is going in and out….
The project is now complete. You can continue to work in debug mode or publish the .net code to somewhere where you can then add in the Sencha code. I will continue to use the debug url, but to publish the app, right click on the project in Solution Explorer and select Publish. The Publish dialog opens . You need to add a publish profile , which can be named anything.
Next select Publish to File System and navigate to where you want the project published.
Now in IIS Manager, add a new application off Default Web Site and call it something short but meaningful. Complete the config as shown in the following screen shot.

Once saved, browse to your localhost url and you should see the default homepage for the app:
Sencha Touch project
Now the back end is out the way we can start on the Sencha Touch application.Go back to your project in VS 2012 and add a new folder off root called Mobile or Sencha if preferred to drop the Sencha Touch code into. The code is up on github so I won’t show it all here. But a quick explanation is I used Stuart’s example code but moved PersonModel.js into the model sub folder and edited the namespace. I then added the Ext.ux.OfflineSyncStore js files to the root and a TabPanel view, a store (MyStore) which extends the OfflineSyncStore, and a controller to handle events and do the syncing….
Start a debug session through Visual Studio and navigate to the sencha app at http://localhost:xxxx/Mobile/index.html. You will see the form on the first tab to enter details. On the View Data tab there will be no data listed as none has been entered. Add a user on the form and click Add. Open up dev tools on chrome and view Resources tab. You will see the data just added in localStorage….now check the database. No data still. You need to press the Sync Data button to move the record(s) across . I’ve done this to show how to sync the data in a separate function rather than mixing it in with the SaveData function. It uses the .syncServer() method. Instead of clicking a button this could just be checking whether the device is online or offline.
Thanks to Stuart Ashworth for helping me out with a few bugs.
Please see this post on how to view the site on other devices through localhost.
Packaging a Sencha Touch App for iOS using Windows 7.
UPDATE: It seems from comments made by Ryan and Michael (see comments) that this packaging example no longer works with the latest versions of Sencha Cmd tool and SDK. Ryna has succesffuly packaged using an old version of Sencha Cmd (ver 3.1.2.342), however, which I have available on my drop box:
https://dl.dropboxusercontent.com/u/33874842/SenchaCmd-3.1.2.342-windows.exe.zip.
These are the steps I took, in detail, to package a Sencha Touch application for iOS using Windows 7. This means you can install the Sencha Touch app onto your iphone or ipad as a native application instead of browsing to it. The process is complex, involves several steps and took a few goes to get right. It may change as well depending on new releases of software particularly from Sencha. I’ll try to keep the instructions up to date as much as possible. But if anyone finds them to be incorrect or have found a better way then please add a comment. I have used the following posts as my own guide when packaging for the first time and this post just brings these instructions together, focusing on Sencha Touch.
Leslie Hanks post: iOS Development on Windows w/ PhoneGap Build
I have also used Emanuele’s screenshots in this tutorial as they show exactly what I need. His post was the most helpful.
As with any of my posts I like to start from the presumption that you have none of the software and are starting from the very beginning. These are the steps you need to take:
1. Download and install Sencha software
2. Acquire an Apple Dev Member Login and get Device Name and UDID
3. Create a new Sencha Touch app
4. Build a production version of the Sencha Touch app
5. Download and install Open-Ssl
6. Login to Apple Developer Member Center
7. Generate a developer certificate signing request (.csr) file using Open-Ssl and upload to iOS Provisioning Portal
8. Use the cer downloaded from Apple to generate a .p12 file
9. Acquire a Development Provisioning Profile
10. Package the Sencha Touch app using Sencha Cmd Tools
11. Add the application to iTunes
1. Download and install Sencha software
To begin with, if you haven’t already done so, you need to download the latest Sencha Touch sdk, which, at the time of writing was 2.1.0. You can download it from here. The download is a zip file. Mine was named sencha-touch-2.1.0-commercial.zip. Once you have downloaded it, you can copy the contents of the zip to C:\inetpub\wwwroot\sencha or similar and browse to it at http://localhost/sencha. When browsing to the address you should see the sencha docs page as default. If the browser (chrome) throws an error such as “Failed to load resource: the server responded with a status of 404 (Not Found)”,then you need to add .json as a mime type to IIS.
The other Sencha tool to download is the Sencha Cmd tool.You can download this tool from here. At time of writing the version was 3.0.0.250. The download was named SenchaCmd-3.0.0.250-windows.exe.zip. Once downloaded you just need to double click on the exe and go through the installtion process. Once you have installed the tool you can open a command prompt (Start>cmd) and type in “Sencha”. You should get the following output:
Microsoft Windows [Version 6.1.7601]
Copyright (c) 2009 Microsoft Corporation. All rights reserved.
C:\Users\alex.graham>Sencha
Sencha Cmd v3.0.0.250
Options
* –debug, -d – Sets log level to higher verbosity
* –plain, -p – enables plain logging output (no highlighting)
* –quiet, -q – Sets log level to warnings and errors only
* –sdk-path, -s – sets the path to the target framework
Categories
* app – Perform various application build processes
* compile – Compile sources to produce concatenated output and metadata
* fs – A set of useful utility actions to work with files.
* generate – Generates models, controllers, etc. or an entire application
* manifest – Extract class metadata
* package – Packages a Sencha Touch application for native app stores
* theme – Builds a set of theme images from a given html page
Commands
* ant – Invoke Ant with helpful properties back to Sencha Command
* build – Builds a project from a JSB3 file.
* config – Loads a config file or sets a configuration property
* help – Displays help for commands
* js – Executes arbitrary JavaScript file(s)
* which – Displays the path to the current version of Sencha Cmd
C:\Users\alex.graham>
This means that it has installed ok. As you may have figured, Sencha Cmd is a command line tool from which you can run several processes related to Sencha Products. One of which is packaging the app for iOS or other mobile platforms.
Acquire an Apple Dev Member Login and get Device Name and UDID
Acquiring an Apple Developer login is a process covered in this blog post by Emanuele Feranato. You need to sign up and pay $99 to acquire a login that will enable you to access the iOS Provisioning Portal and acquire the necessary certificate and Provisioning Profile to make the app work with an Apple device.
At this point you can also get the UDID of the iphone(s) and ipad(s) that you wish to install the Sencha Touch app onto. You need to enter these into the iOS Provisioning Portal when logged into the Apple Dev Member Centre. To get the UDID you can either connect the device whilst in iTunes and click on the serial number for the device or install an app onto the device such as UDID sender. The UDID is 40 characters long. Also note down the Device’s name (e.g. “Peter’s iPhone”).
3. Create a new Sencha Touch app
The starting point with Sencha is to create a new boilerplate code template, which can be used to generate a production build, which in turn will be packaged into an iOS native app. To create a new app, open a command prompt and cd into the root of the Sencha Touch sdk (in my case C:\inetpub\wwwroot\sencha). Then type in “sencha generate app test .\test”. The Sencha Cmd tool will generate a new Sencha Touch application called “test” in the directory C:\inetpub\wwwroot\sencha\test”. You can test that the app works by browsing to http://localhost/sencha/test.
4. Build a production version of the Sencha Touch app
Using the Sencha Cmd tool again, you can build a production version of the app. This is bascially a slimmed down version of the same app with all the debug code removed and only the required files included. This step is necessary as you don’t want to copy an unnecessarily big application onto your phone. You can get a production build by cd ing to the test application root (C:\inetpub\wwwroot\sencha\test) then typing in “sencha app build production”. This will build the application into C:\inetpub\wwwroot\sencha\test\build\production). Again you can browse to http://localhost/sencha/test/build/production to test that this has worked. You should see the same page as when you browsed to http://localhost/sencha/test but the production build is probably noticeably quicker to load.
5. Download and install Open-Ssl to generate the Developer Certificate
So now we have a Sencha Touch production built app ready for packaging. And this is where the process becomes more complex, bringing in other software to help with the task. You need to download and install Open-ssl, which will enable you to generate the .p12 Developer certificate that must be used when packaging the Sencha Touch application. To download Open-ssl you need to go here. I downloaded the Visual C++ 2008 Redistributables and Win32 OpenSSL v1.0.1c installs and installed them in this order. One other thing to do is to set the config path for openssl by entering the following command:
set OPENSSL_CONF=c:\[PATH TO YOUR OPENSSL DIRECTORY]\bin\openssl.cfg
Once Open-ssl is installed you can test by opening a command prompt, cd ing to the bin directory of openssl (in my case C:\openssl-win32\bin and typing in “openssl”. You should get an openssl>prompt.
6. Login to Apple Developer Member Center
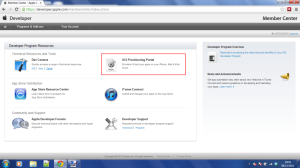
With Open-Ssl installed, you can generate the .p12 certificate for the Sencha Touch “test” application. To begin with you need to generate a certificate signing request that you will upload to the Provisioning Portal, so make sure you are logged in to the Apple Developer Center. Once logged in you need to click on the iOS Provisioning Portal section.
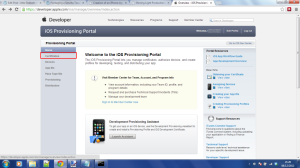
You then need to click on the certificates link in the left hand navigation.
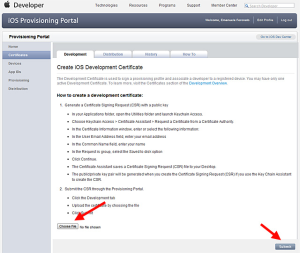
7. Generate a developer certificate signing request (.csr) file using Open-Ssl and upload to iOS Provisioning Portal
So you have an Open-Ssl prompt and you also are logged in to Apple Dev Center and are on the Certificates page of the iOS Provisioning Portal. You now need to generate a .certSigningRequest file to upload which will cause the Apple site to generate a .cer file which you then download and convert into a .p12 file. To generate the .csr file at the openssl> prompt type:
openssl>genrsa -out private.key 2048
This is to generate the private key to use to sign the certificateSigningRequest file.
You should get output similar to
Generate Private Key
Loading ‘screen’ into random state – done
Generating RSA private key, 2048 bit long modulus
….+++
….+++
e is 65537 (0x10001)
next you need to enter the command to generate the .certSigningRequest file, which is:
openssl>req -new -key private.key -out CertificateSigningRequest.certSigningRequest -subj “/emailAddress=test@mail.com, CN=Alex Graham, C=UK
The output should be
Loading ‘screen’ into random state – done
Note that the emailAddress, CN (your name) and C (country) parameters are required but I don’t think you have to put anything in here that ties into your details entered when creating your Apple login. Its just info that’s used by Apple to create the .cer. So what I’m saying is this info can be anything you want it to be.
Look in the bin folder of open-ssl (C:\openssl-win32\bin) and you should now see a CertificateSigningRequest.certSigningRequest file.
Go back to your logged in Apple screen currently at the certificates page. You should see something similar to this:
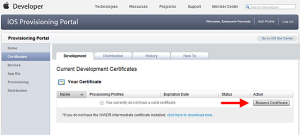
…A screen with no certificates listed. Click on the Request Certificate button. You should now see a screen asking you to upload a file:
Browse to the CertificateSigningRequest.certSigningRequest file and upload this file. The page after the file uploads should now look like:
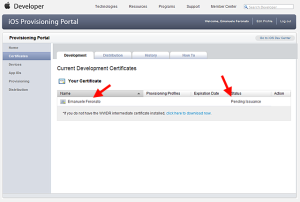
with the request “Pending”, refresh the browser and the page should change to this:
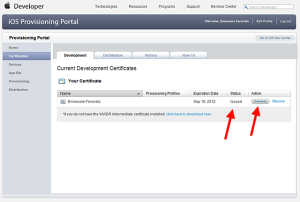
Where you can download the certificate from Apple, which is a file called “ios_development.cer”. Download the file and move it to the C:\openssl-win32\bin folder.
8. Use the cer downloaded from Apple to generate a .p12 file
You now just have to enter two more commands into Openssl to generate the.p12 file. First of all, a command to convert the .cer file into a .pem file:
openssl>x509 -in ios_development.cer -inform DER -out ios_development.pem -outform PEM
Then finally the command to generate the .p12 file:
openssl>pkcs12 -export -inkey private.key -in ios_development.pem -out ios_development.p12
At this point you will be asked to enter and re-enter a password for the .p12 file. Enter a pasword and note it down as this will be used in the packaging process. For this example I will use the password “elbow”.
You now have the ios_development.p12 file in the bin folder. Create a folder called “cert” in your Sencha test app ( C:\inetpub\wwwroot\sencha\test\cert). Move the .p12 file to this new “cert” folder.
9. Acquire a Development Provisioning Profile
Once you have the .p12 certificate, you can create the Provisioning Profile on the Apple Provisioning Portal. Before you can do this you need to go through a few other steps on the Portal.
The first one is the development certificate, which has been created in the steps taken above.
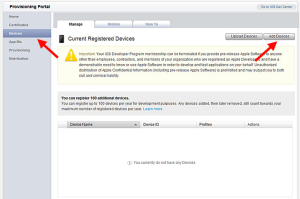
The next step is to register the devices that you want to put the application on to test with. So on the left hand navigation, click on Devices. You should see a screen similar to below
You then add a device
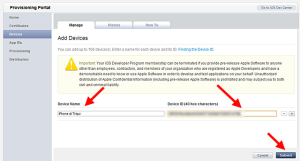
Enter the devices name and UDID as it appeared in iTunes
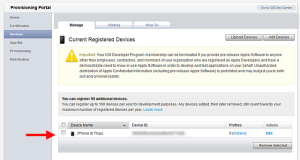
And that’s it, your device is registered.
Repeat the steps above for each device you wish to add.
The last step before creating the Provisioning Profile is to create the AppID for the Sencha Touch application.
To create the AppID, click on App IDs in the left hand navigation of the portal.
You should see the following page
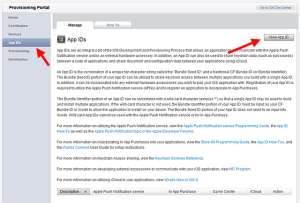
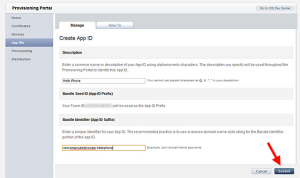
Click on the New App ID button, and enter the required details. these comprise of:
Description: this can be anything but try and make it meaningful such as “SenchaTest”
Bundle Seed ID: This is generated by Apple. Note this for your packaging process.
Bundle Identifier: This is recommended to use a reverse domain style so enter something like “com.exampledomain.senchaTest”
Once the details have been entered, click on Submit and you should see that the AppID has been registered in the following screen:

With the AppID, and Devices registered you can now generate the Provisioning Profile. Click on “Provisioning” on the left hand navigation. You should see this screen:
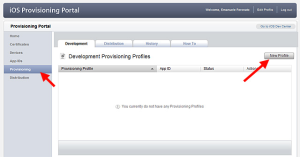
Click on New Profile and enter the required info.
Name: Again, can be anything but for consistency make it “SenchaTestProfile”
Certificates: The certificate created earlier should be selected as default
AppID: The AppID just created should be selected as default.
Devices: The Devices entered earlier should be ticked as default.
If all is ok, click on Submit. The screen should change to say the profile is pending
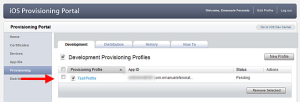
Refresh the browser and the Profile should be ready to download
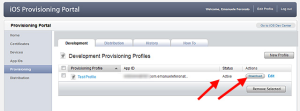
Download the file and add it to the root of your Sencha Test (production build) app at C:\inetpub\wwwroot\sencha\test\build\production. Rename the file to embedded.mobileprovision
10. Package the Sencha Touch app using Sencha Cmd Tools
We are almost there. To package the app for iOS, you now need to run the package command using Sencha Cmd tools but before you do, you need to edit the packager.json file, which Sencha Cmd will use to do the packaging. This should have been created in the test app root folder (C:\inetpub\wwwroot\sencha\test). Browse to this folder and open the file in a text editor. You need to edit it so it contains references to the.p12 file and Provisioning profile that you created, as well as other info. An example of the packager.json file is as follows
<br /><br />{<br /><br /><%%KEEPWHITESPACE%%> "applicationName":"SenchaTest",<br /><br /><%%KEEPWHITESPACE%%> "applicationId":"com.xxxx.SenchaTest",<br /><br /><%%KEEPWHITESPACE%%> "bundleSeedId":"xxxxxxxx",<br /><br /><%%KEEPWHITESPACE%%> "versionString":"1.0",<br /><br /><%%KEEPWHITESPACE%%> "versionCode":"1",<br /><br /><%%KEEPWHITESPACE%%> "icon": {<br /><br /><%%KEEPWHITESPACE%%> "57":"resources/icons/Icon.png",<br /><br /><%%KEEPWHITESPACE%%> "72":"resources/icons/Icon~ipad.png",<br /><br /><%%KEEPWHITESPACE%%> "114":"resources/icons/Icon@2x.png",<br /><br /><%%KEEPWHITESPACE%%> "144":"resources/icons/Icon~ipad@2x.png"<br /><br /><%%KEEPWHITESPACE%%> },<br /><br /><%%KEEPWHITESPACE%%> "inputPath":"./build/production",<br /><br /><%%KEEPWHITESPACE%%> "outputPath":"../packagedTest",<br /><br /><%%KEEPWHITESPACE%%> "configuration":"Debug",<br /><br /><%%KEEPWHITESPACE%%> "platform":"iOS",<br /><br /><%%KEEPWHITESPACE%%> "deviceType":"iPhone",<br /><br /><%%KEEPWHITESPACE%%> "certificatePath":"./cert/ios_development.p12",<br /><br /><%%KEEPWHITESPACE%%> "certificatePassword": "elbow",<br /><br /><%%KEEPWHITESPACE%%> "provisionProfile":"./build/production/embedded.mobileprovision",<br /><br /><%%KEEPWHITESPACE%%> "orientations": [<br /><br /><%%KEEPWHITESPACE%%> "portrait",<br /><br /><%%KEEPWHITESPACE%%> "landscapeLeft",<br /><br /><%%KEEPWHITESPACE%%> "landscapeRight",<br /><br /><%%KEEPWHITESPACE%%> "portraitUpsideDown"<br /><br /><%%KEEPWHITESPACE%%> ]<br /><br />}<br /><br />
If you followed this example exactly as described then you only have to change the following
applicationName: Set this to what you called the app in the AppID Description
applicationId: This should be what you entered as the reverse domain for the Bundle Identifier in the AppID
bundleSeedId: Enter the 10 digit string that was generated in the App ID by Apple, e.g. YUUIO898PO
certificatePassword: This is the password you entered when generating the .p12 file. in this example it was “elbow”.
Now the packager.json file is ready you can now package the app. Open a command prompt and cd to the Sencha test folder :
>cd C:\inetpub\wwwroot\sencha\test
Then enter the sencha package command:
>sencha package build packager.json
If you get no output at all and a prompt appears after a few seconds this means that the app packaged succesfully. You should find it in the following location; C:\inetpub\wwwroot\sencha\packagedTest. The folder name should be SenchaTest.app.
Worth adding here is that I asked about the no output from package build command on the Sencha Forums. Svenna responded by suggesting I use >sencha app build native command instead. I have not tried this but will do and will edit this blog if it works for me.
11. Add the application to iTunes
Plug the device that you registered into your computer and open iTunes. For this example I presume you have plugged in your iphone. Whilst in iTunes click on “File” in the menu and select “Add Folder to library”. Browse to the SenchaTest.app folder and select it. Now select the phone whilst in iTunes so you see the phone details in the main screen. Select the Apps tab for the phone. You should see the SenchaTest app listed on the list of apps on the left hand side and a view of the Phone’s screens on the right hand side. Tick the SenchaTest app and click on sync. You will see iTunes syncing the application to the phone and in a few seconds you should see the app on your iphone.
Congratulations! Now have a cup of tea to celebrate 😉
Hope this post helps anyone doing the same thing on their windows 7 machine. If you have anything to add or any helpful comments then please add them in the comments section
Using heroku for Sencha Touch demo site
I needed to put a demo Sencha Touch app to showcase some of features of the framework. I wanted to put this somewhere that I could easily put up and take down if required. Currently I have no domain space that was suitable so decided to use Heroku for the job mainly to see what steps were required to get such a thing working with node.js.
The solution was quick and easy to implement.
Firstly I created a node.js script to do the serving of the page. The script was not all that different from the example in this tutorial, which used the node-static npm
var static = require('node-static'),
  http = require('http'),
  util = require('util');
var webroot = './sencha',
  port = process.env.PORT || 5000;

var file = new(static.Server)(webroot, {
  cache: 600,
  headers: { 'X-Powered-By': 'node-static' }
});
http.createServer(function(req, res) {
  req.addListener('end', function() {
    file.serve(req, res, function(err, result) {
      if (err) {
        console.error('Error serving %s - %s', req.url, err.message);
        if (err.status === 404 || err.status === 500) {
          file.serveFile(util.format('/%d.html', err.status), err.status, {}, req, res);
        } else {
          res.writeHead(err.status, err.headers);
          res.end();
        }
      } else {
        console.log('%s - %s', req.url, res.message);
      }
    });
  });
}).listen(port);
console.log('node-static running at http://localhost:%d', port);
I knew this script was very basic but as I didn’t have much time to do this (literally an evening), and it worked I decided to go with it.
I put all the sencha code into a sub folder called “sencha” and saved the javascript above as server.js. I then tested running it locally by using command “node server.js”. Browsing to http://localhost:5000 brings up ./sencha/index.html, which in turn should load up the sencha app. It seems node-static, like any web server, defaults to index.html in the absence of any specific request.
This all worked fine so to get the app on heroku. I had to add a Procfile and a package.json file. The Procfile just had one line; web: node server.js. The package.json file contained the node-static npm version:
{
  "name": "static",
  "version": "0.0.1",
  "dependencies": {
    "node-static": "0.6.4"
  }
}
You must have the correct version for any npm’s used or heroku will crash when deploying. To make sure you have this, execute the following locally:npm list. This will list all npms saved and their versions.
Once you have everything in place you can deploy to Heroku using their instructions: https://devcenter.heroku.com/articles/nodejs
